
The AI assistant Claude compiled this guide on behalf of Peter Hoenig from the suite’s instructions, source code and test records. Peter Hoenig checked and published it.
The MC4Y Productivity Suite does not run in a cloud but on your own computer or server. In this guide I describe every installation route in detail: the Windows PC, the Mac and Linux for one person, Windows Server with IIS and the Linux server for a team, plus certificate, first account, e-mail, network drive, backup, update, the desktop taskbar and the agents for the CMDB. For each system I say what I have tested and what I have not. The short step-by-step guide for beginners remains the post Installing the MC4Y Suite; how you then work with the suite is described in the user manual.
Status of this guide: 12 November 2026, MC4Y Suite 0.4.60, MC4Y Taskbar 1.7.8. The pictures of the graphical installer come from its demonstration mode, which changes nothing and shows invented sample data; the pictures of the suite come from a freshly created test installation with invented names.
Which installation suits you?
The suite has two modes of operation, and almost everything else follows from them.
- Browser only: if you want to use the tools on your own and save your work as files, you do not need the suite. Unpack mc4y-werkzeuge.zip, double-click
index.html– done, on any Windows computer, any Mac and on Linux. - Single workstation: the suite for you alone, with sign-in, shared storage for all tools, document library, wiki, notes, tasks, calendar and a daily backup. It deliberately listens only to this one computer (
127.0.0.1), so it cannot be reached from a phone or another PC. - Server for a team: everyone works together in the browser, encrypted via HTTPS, with Windows sign-in if you wish. This is set up by the person who looks after your servers – on a Windows Server with IIS, a Linux server or a web hosting package.
Two building blocks come on top, independently of this: the desktop taskbar, a small program at the edge of the screen that opens the suite’s tools with one click, and the agents and crawlers, which report devices to the suite’s CMDB. You set up both on the workstations, not on the server.
You can start small. Files from “Browser only” open again later in the suite, and a single-workstation suite on Linux can be turned into a server with the same script.
What is tested on which system?
I test every version on several systems before release. The table shows what has actually run for the installation – not what the script is meant to support.
| System | Tested | Not tested |
|---|---|---|
| Windows 11 | single workstation with the graphical installer and updates; desktop taskbar; CMDB agent | Windows 10 (supported, but without a test run of its own) |
| Windows Server with IIS | real installation and updates on a Windows Server 2022 Standard; network drive and calendar on the IIS of a Windows 11 computer (35 of 35 checks) | Windows Server 2016 and 2019; installing under strictly configured behaviour protection |
| Linux | Ubuntu 26.04.1 LTS under WSL: dry run, single workstation, server with Apache and with nginx (HTTPS), uninstalling, agent and crawler, network drive with nginx and PHP-FPM | Debian, Linux Mint, Fedora, Red Hat, Rocky, AlmaLinux, openSUSE and Arch on real systems |
| macOS | single-workstation installation on a real Mac (October 2026) | server mode, the e-mail task under launchd, the desktop taskbar on a real Mac |
What does “under WSL” mean?
WSL is the Windows Subsystem for Linux: a real Ubuntu with systemd, Apache, nginx and PHP that runs on a Windows computer. The scripts work there exactly as on a Linux computer of its own. The script recognises other distributions by itself and uses their package manager – apt-get (Debian, Ubuntu, Mint), dnf or yum (Fedora, Red Hat, Rocky, AlmaLinux), zypper (openSUSE) and pacman (Arch, Manjaro).
On these systems please run a dry run first; it changes nothing and shows line by line what would happen. On openSUSE and Arch the name and integration of Apache differ, so the dry run is particularly important there. How the tools themselves behave on macOS and Linux is described in the post MC4Y tools on Mac and Linux.
What do you need beforehand?
- For all routes: a current browser (Edge, Chrome, Firefox or Safari), internet access during the installation and about 1 GB of free space. The suite’s system check later reports yellow if less than 2 GB is free, because the backups need space.
- Windows PC: Windows 10 or 11 and the password of an administrator account. The installation downloads PHP 8.5 from windows.php.net (about 35 MB) and, if needed, the Visual C++ runtime from Microsoft.
- Windows Server: recommended from Windows Server 2019; the installation adds IIS itself. For sign-in with the company account, an Active Directory.
- Mac: macOS 12 (Monterey) or newer, Intel Mac or Apple silicon, an administrator account. You do not need Homebrew or Xcode.
- Linux: bash 4.4 or newer and systemd, an account with
sudo. PHP 8.2 or newer (8.4 recommended) with pdo_sqlite, mbstring, openssl, fileinfo, sodium and zip; the script installs missing packages after asking. For server mode, Apache or nginx, PHP-FPM, openssl and curl. - Desktop taskbar: Python 3.8 or newer with tkinter (Tk 8.6). The suite itself needs no Python.
You do not need database software; the suite uses the SQLite included in PHP. Please do not unpack the package in a Nextcloud or other cloud folder: hidden files such as .htaccess and execute permissions get lost in the process.
The graphical installer step by step
The graphical installer is a page in the browser, operated by a small helper on your computer. The helper listens only on 127.0.0.1 and to a random key in the address; nobody can reach it from the network. At the top right you switch the language with “DE | EN”, and the installation scripts then write in the same language.
How do I start the installer?
- Windows: download the package, right-click “mc4y-suite.zip” in File Explorer › “Properties” › under “Security”, tick “Unblock” › “OK”. Then “Extract All…” and double-click “Installer-starten” in the unpacked folder. A black window “MC4Y-Suite - Installer” opens; leave it open until everything is done.
- Linux: open a terminal in the unpacked folder and enter
bash installer-starten.sh, withoutsudo– the system asks for your password itself when installing. - Mac: in Terminal,
bash installer-starten.command. On the Mac the graphical installer also needs Python from python.org; the installation script is simpler there (see below).
If no browser opens, the black window shows a long address. Copy it into your browser’s address bar.
Step 1: What would you like to set up?
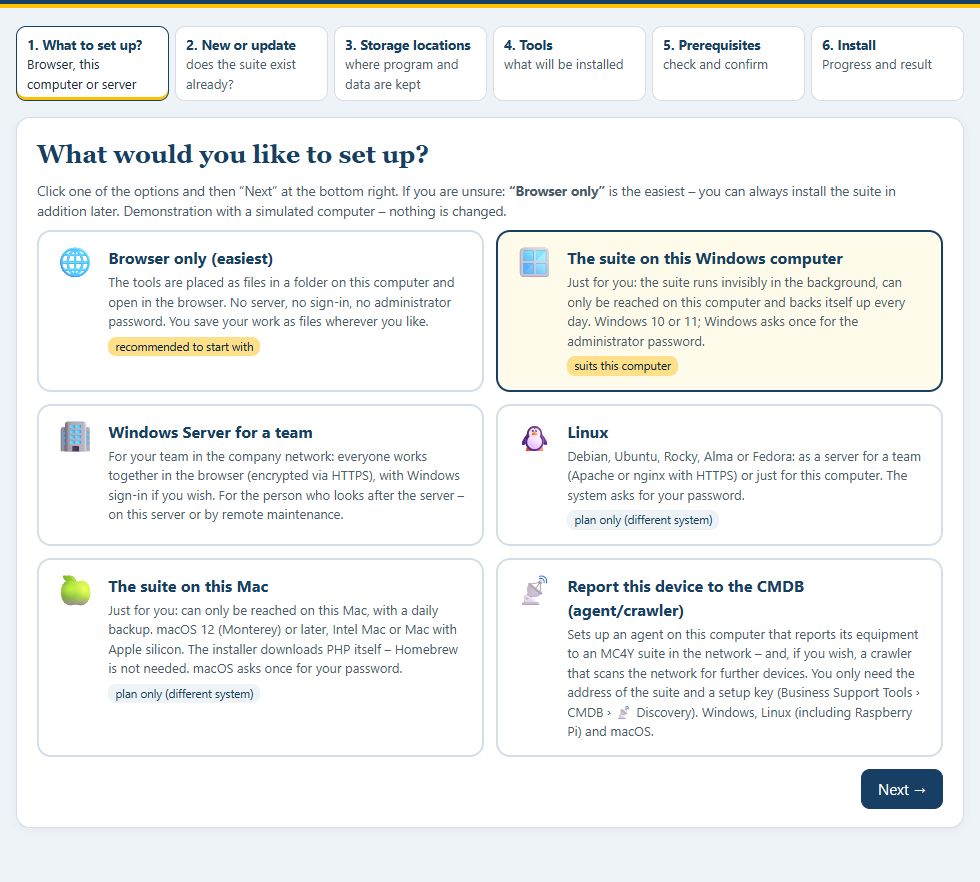
The first step offers six options: “Browser only (easiest)”, “The suite on this Windows computer”, “Windows Server for a team”, “Linux”, “The suite on this Mac” and “Report this device to the CMDB (agent/crawler)”. The tile that fits your computer is marked “suits this computer”. Other systems can only be planned: at the end you then get an answer file, which you place next to the installer on the target computer.
Steps 2 and 3: existing installation and storage locations
In the step “New or update” the installer looks for an existing suite. If it finds none, it says “No existing installation found – a new installation will be made.”
In the step “Storage locations” you deliberately choose four locations yourself: program, PHP, data storage and daily backups. The simplest way is to click a drive next to “All locations on”; on C: the installer uses the Windows default locations, on other drives folders of their own at the root, such as E:\MC4Y-Suite. After that, each location can be changed individually. If possible, put the backups on a different drive from the data.
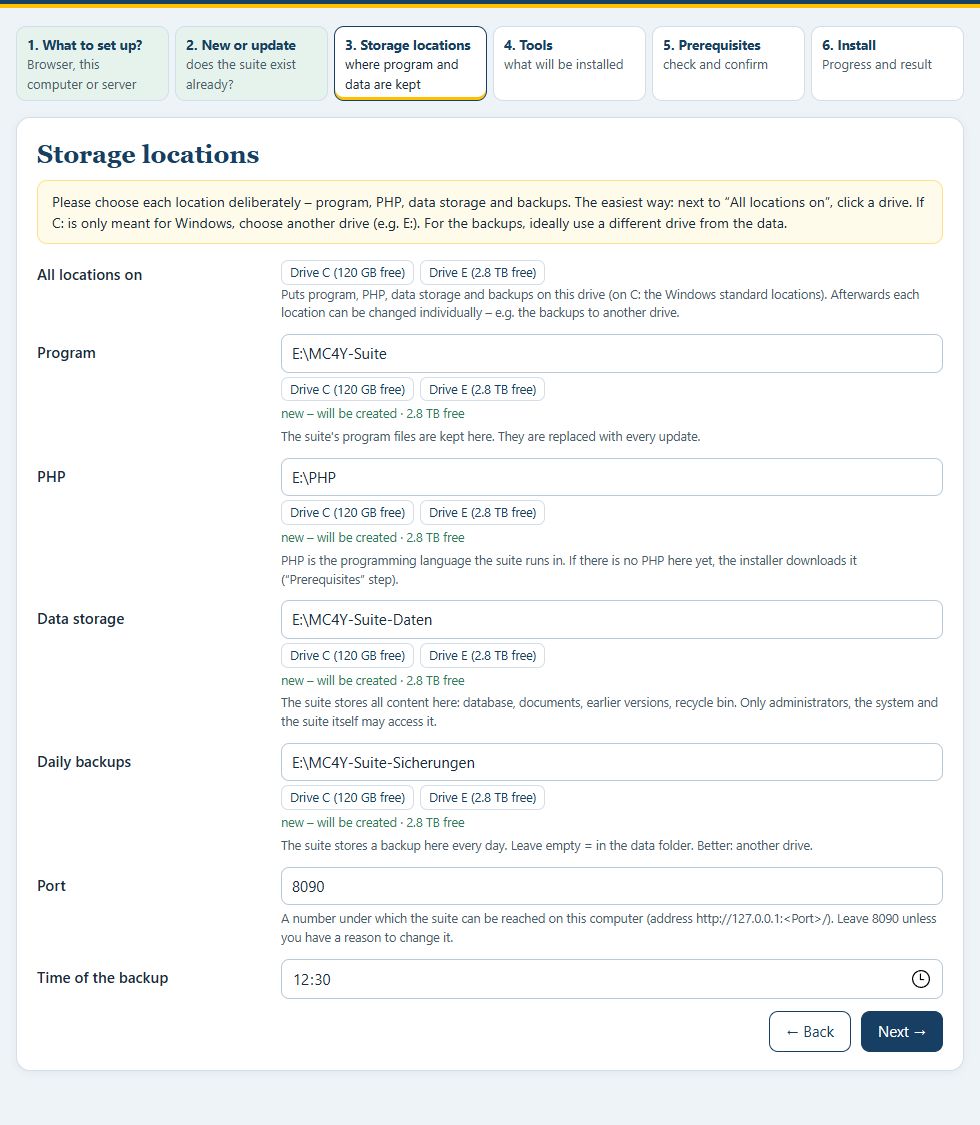
The installer checks each location immediately under the field. Green means OK, red gives the reason, for example a folder that is not empty or a drive without NTFS. As long as a field is red, “Next →” stays grey. The data folder must be on this computer, not on a network share: the suite runs under a service account of its own, and its database needs file locks that a share does not provide reliably. On a single workstation you also set the port here (default 8090) and the time of the daily backup.
Steps 4 and 5: tools, prerequisites and dry run
In the step “Tools” you choose what is installed. If in doubt, leave everything selected; on Windows this is also where the entry “Desktop taskbar” appears.
In the step “Prerequisites” the installer checks your computer and, to do so, runs the installation script once as a dry run that changes nothing. The table shows what is present (“✓ present”) and what is additionally downloaded (“⬇ will be installed”), each with source and size. Under “What the installation script will do (dry run)” you expand the planned work steps.
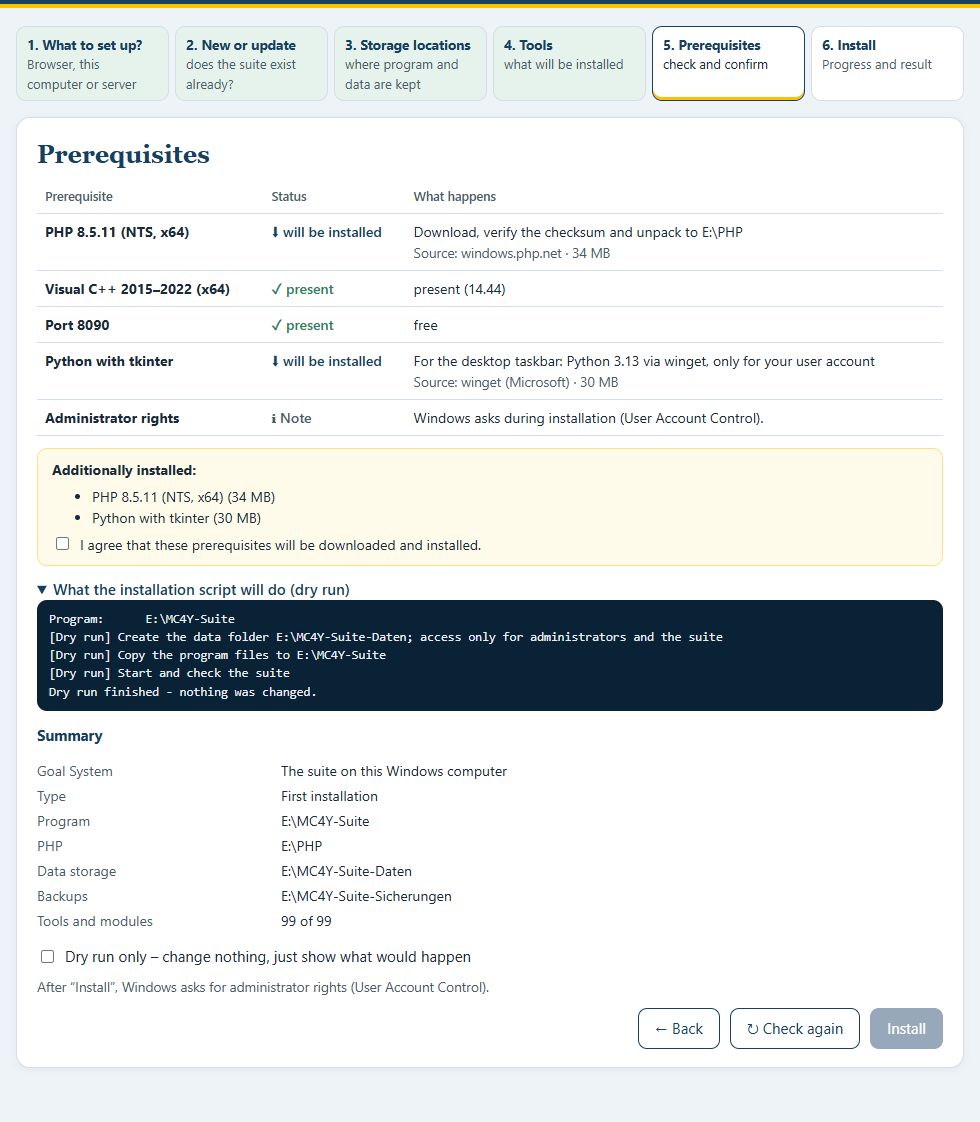
Nothing is downloaded without your consent: tick “I agree that these prerequisites will be downloaded and installed.” If you only want to see what would happen, tick “Dry run only – change nothing, just show what would happen” instead. The button then starts a dry run, and Windows does not ask for administrator rights. For the remote maintenance of a server there is no such dry run; there you run installieren-server.bat -Probelauf on the server itself.
Step 6: installing and the result
After “Install”, Windows asks once for administrator rights. The list of work steps gets a tick one after the other; this usually takes 2 to 10 minutes. At the end you see “Installation complete.” with the address and the program, data and backup folders.
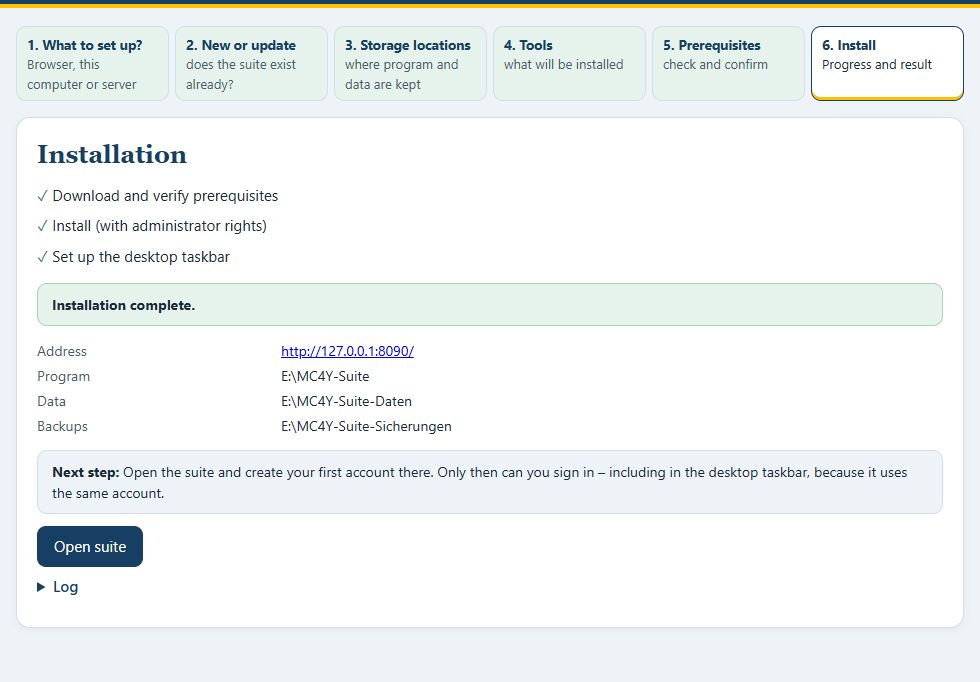
The next step is always the first account (see below); only after that can anyone sign in, the desktop taskbar included. On a server the installer additionally shows the setup code for this first account here. Under the log there is the button “📋 Copy report”: it puts the log, target system, storage locations and prerequisites into the clipboard as text, without passwords – so you can pass on an error without taking a screenshot. Finally, click “Close installer”.
Single workstation on Windows
With the graphical installer you choose “The suite on this Windows computer” and follow the six steps above. The installation creates the system account mc4y-systemuser, which cannot sign in, and three scheduled tasks: “MC4Y-Suite” starts the suite at boot, “MC4Y-Suite-Sicherung” makes the daily backup, “MC4Y-Suite-Mail” sends e-mails every 5 minutes and does nothing as long as sending is switched off. In addition there is the shortcut “MC4Y Productivity Suite” on the desktop and in the Start menu (on a computer set to German “MC4Y-Produktivitaetssuite”) and the log installation_<time>.log in the program folder.
Without the graphical installer it works in the command prompt in the unpacked package:
install\windows\installieren.bat -Probelaufshows what would happen.install\windows\installieren.bat -PhpZip <php-8.x.y-nts-Win32-vs17-x64.zip> -PhpSha256 <checksum>installs with a PHP downloaded beforehand (“VS17 x64 Non Thread Safe” from windows.php.net, where the checksum is shown next to it).- Without questions: additionally
-Programm E:\MC4Y-Suite -Daten E:\MC4Y-Suite-Daten -SicherungOrdner F:\MC4Y-Suite-Sicherungen. - Without internet: put the PHP package with a
.sha256file of the same name andvc_redist.x64.exeinto a foldervoraussetzungennext toinstaller.html. - English messages: add
-Sprache en.
Installing from a network share: the unpacked package may lie on a server, for example under \\server\software\MC4Y-Suite-0.4.60. Give the path in this long form and not via a mapped drive letter such as Z: – Windows does not show mapped drives to a program with administrator rights. If the installer reports that the package is not readable, the administrator account cannot reach the share; then copy the folder once to C:\Temp.
Single workstation on the Mac
On the Mac the installation script is the simplest route; it needs no Python. Please do not start the package’s files by double-clicking them in Finder – macOS blocks this for files from the internet. Via Terminal with bash … this problem does not arise.
- Download the package and unpack it in Finder under “Downloads” (Safari often does this itself).
- Open Terminal (cmd + Space, “Terminal”), type
cdand a space, drag the folder “MC4Y-Suite-0.4.60” from Finder into Terminal, press Return. - Enter
bash install/macos/installieren.command --lang enand type your Mac password (no characters appear while typing). - Accept the suggestions for data folder, desktop taskbar and start at sign-in with Return, and likewise “Run the installation now?”.
- At “Done. Address: http://127.0.0.1:8090/” the browser opens with “Set up the suite”.
The script downloads its own PHP 8.4 from static-php-cli, checks it against a fixed SHA-256 checksum and puts it into /Library/Application Support/MC4Y-Suite-PHP. This PHP lacks the extensions sodium, ldap and opcache; the suite then stores passwords with PHP’s own Argon2id. With --php-quelle homebrew the script uses PHP from Homebrew instead.
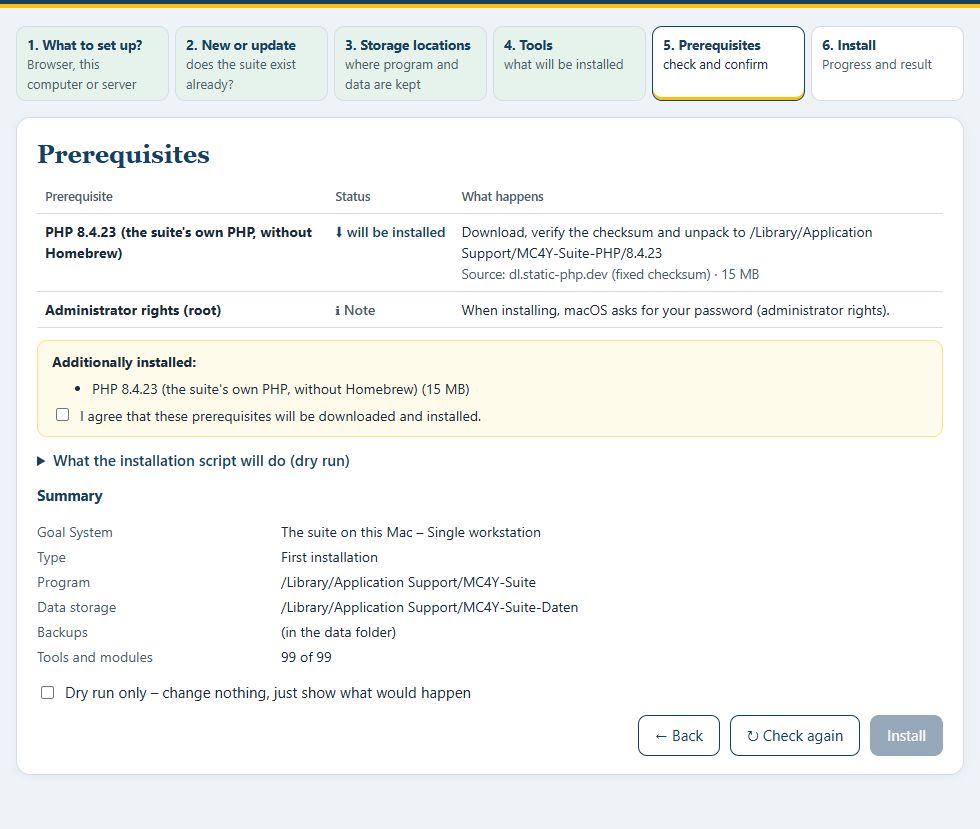
The script sets up a hidden system account, the service de.my-coaching4you.mc4y-suite under launchd, the daily backup at 02:30 (if the Mac was asleep, macOS catches up when it wakes), the e-mail task every 5 minutes and the program “MC4Y Suite” in the “Applications” folder. Further options: --probelauf (dry run), --daten <folder>, --port <no.>, --taskleiste or --ohne-taskleiste, --lang de|en and --hilfe for all of them.
Single workstation on Linux
- Download the package and choose “Extract Here” with the right mouse button in the file manager.
- In the unpacked folder, right-click and choose “Open in Terminal”.
- Enter
sudo bash install/linux/installieren.sh --einzelplatz --lang enand type your password. - Let it install missing packages, and accept the suggestion for the data folder and the question whether to run the installation now with Return.
- At the end it says that the suite is running at
http://127.0.0.1:8090/.
The suite then runs as the systemd service mc4y-suite with PHP’s built-in web server under the system account mc4y-systemuser, which cannot sign in. The program lives in /opt/mc4y-suite, the data in /var/lib/mc4y-suite-daten with permissions for this account only. systemd timers take care of the daily backup at 02:30 and of sending e-mails every 5 minutes; without systemd, entries in /etc/cron.d.
Before the real installation, --probelauf shows the summary and all planned steps and ends with the message that nothing was changed. If the package lies on a network share, in a cloud or on a phone (paths under /run/user/…/gvfs/), only your own account sees the folder, not root. The script then stops and names the command for copying: cp -a "<location>" ~/mc4y-paket && cd ~/mc4y-paket.
Windows Server with IIS for a team
The simplest way to set up the server is the graphical installer: choose “Windows Server for a team”, then work on the server itself or by remote maintenance from your own workstation. The installation switches on the required IIS role services (CGI/FastCGI, Windows authentication), sets up PHP with its own php.ini, creates the application pool “MC4Y-Suite” with a virtual identity, generates an HTTPS certificate, opens the firewall and sets up the daily backup and the e-mail task. At the end it shows the setup code for the first account and writes KURZANLEITUNG.txt into the program folder.
On the server or by remote maintenance?
“On this server” means the installer runs on the Windows server itself. “On another server (remote maintenance)” works from your computer via Windows Remote Management (WinRM, port 5985, Kerberos). You enter the full name of the server and, if you wish, an account; Windows asks for the password in a window of its own, and it is neither stored nor logged.
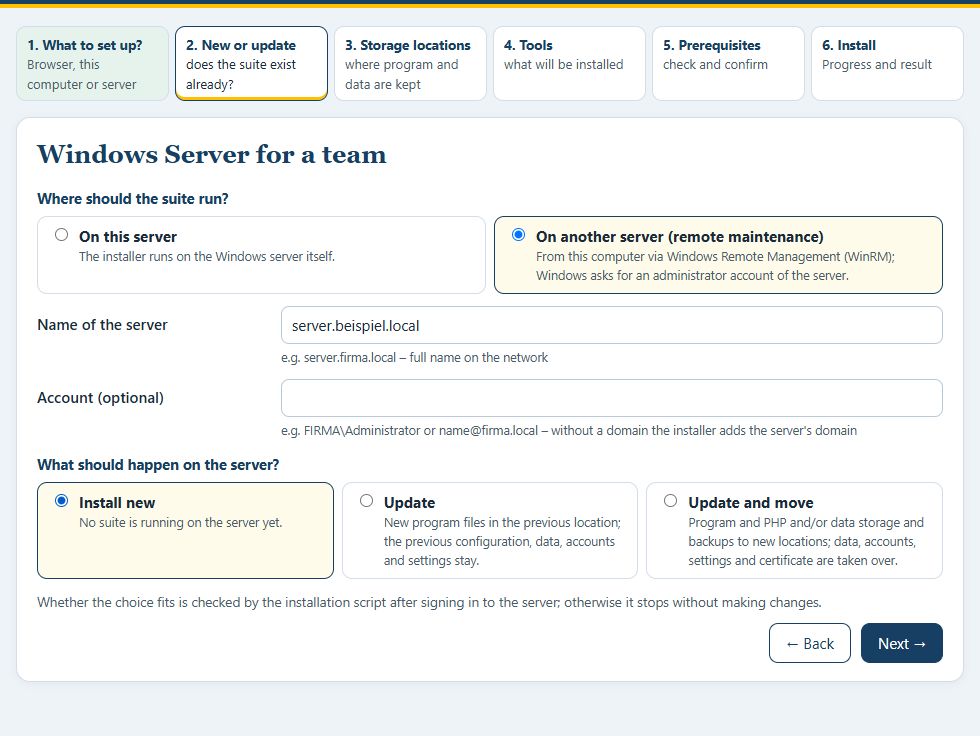
For remote maintenance you also choose straight away what should happen: “Install new”, “Update” or “Update and move”. Whether the choice fits is checked by the installation script after signing in to the server; otherwise it stops without making changes. Without the graphical installer the commands are install\windows\installieren-server.bat (on the server) and auf-server-installieren.ps1 -Server server.firma.local (from the workstation).
Name, certificate and Windows sign-in
In the step “Storage locations” further fields appear for the server. Under “Name on the network” the workstations reach the suite. “Certificate (optional)” takes the fingerprint of an existing certificate; if empty, the installation creates a self-signed certificate for five years. In addition there are the boxes “Allow sign-in with the Windows account (Active Directory)” and “Open the firewall for HTTPS and HTTP (domain, private)”.
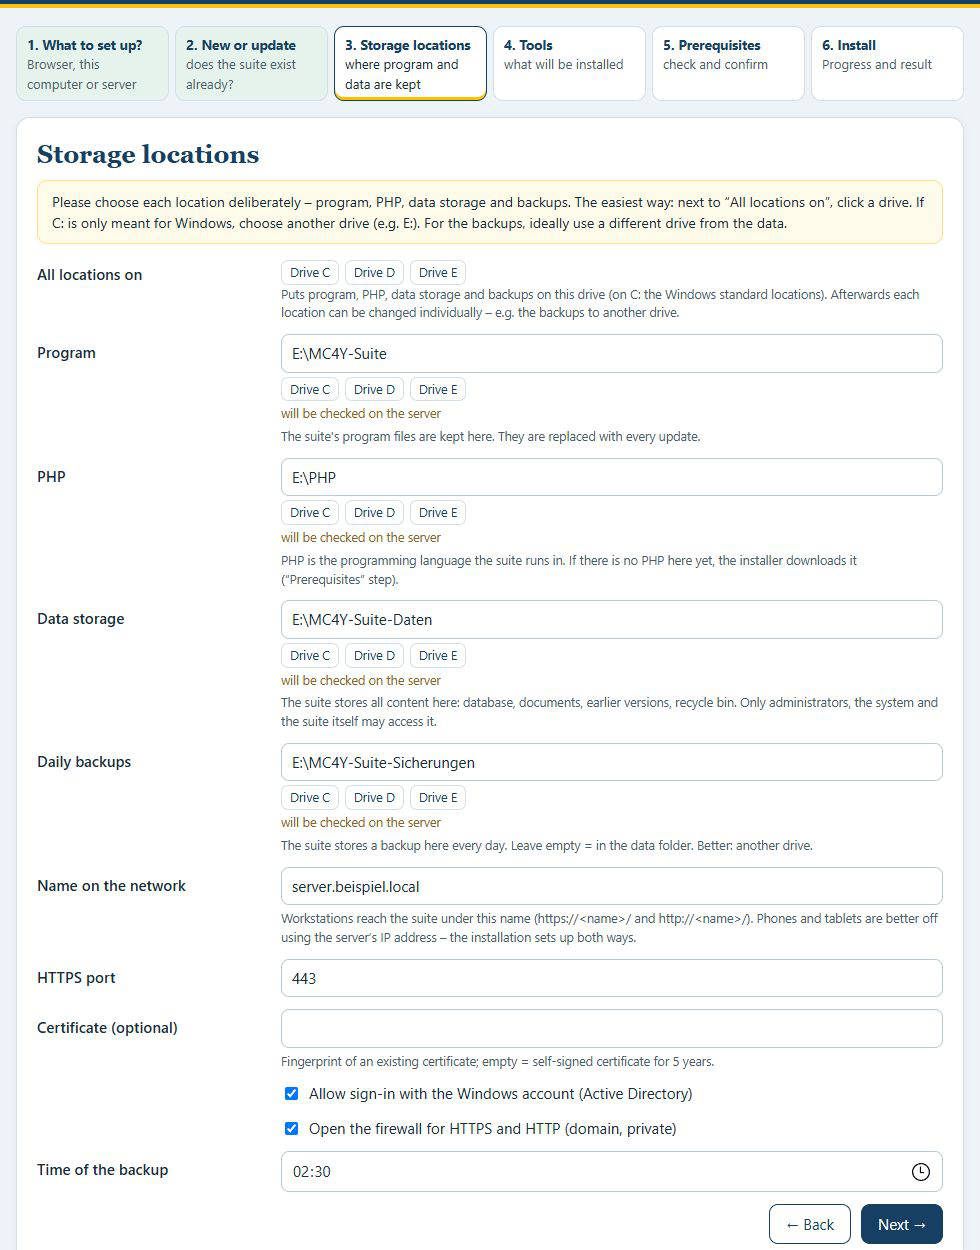
The server installation sets up four access routes at once: https:// and http://, each with the name and with the IP address of the server. Over HTTP the sign-in page points to the encrypted address. The daily backup runs at 02:30.
How do workstations and phones reach the suite?
On a PC the server name is more convenient, on a phone the IP address is more reliable: Android and iOS usually do not find names ending in .local. The suite shows all addresses at the bottom of the portal under “Other devices”, each with a QR code, plus the certificate’s fingerprint and a button to download the certificate.
- Upgrading an older server installation: run
HTTP-Zugang-einrichten.baton the server as administrator. It measures first, shows, asks, backs upkonfig.phpand measures again afterwards;-Probelaufonly shows,-Rueckgaengigundoes everything. - A phone cannot reach the suite: start
Erreichbarkeit-pruefen.baton the server and enter the phone’s IP address. It distinguishes a different network, device isolation in the Wi-Fi and a missing firewall rule, and never changes anything. - HTTPS only:
-OhneHttpwhen installing.
Company computers are best given the certificate by group policy (see the certificate section). You switch on sign-in with the Windows account after the first account, in the suite under “Administration” › “Sign-in (domain)”; the suite then signs in with the person’s own account, no service account of its own is needed.
Linux server with Apache or nginx
sudo bash install/linux/installieren.sh sets up server mode with Apache, --webserver nginx --host suite.firma.example with nginx and a name of your own. Beforehand, --probelauf shows what would happen; the dry run also works without sudo. With the graphical installer you choose “Linux” and the server for a team.
Apache or nginx, HTTPS or HTTP too?
The script sets up a PHP-FPM pool “mc4y-suite” of its own under the system account mc4y-systemuser, not under the web server’s account. The web server delivers only the folder public/, blocks hidden files and redirects HTTP on port 80 to HTTPS. Without a certificate of your own (--zertifikat <file> --schluessel <file>) it creates a self-signed one. On Red Hat and related systems it sets the SELinux labels for program and data.
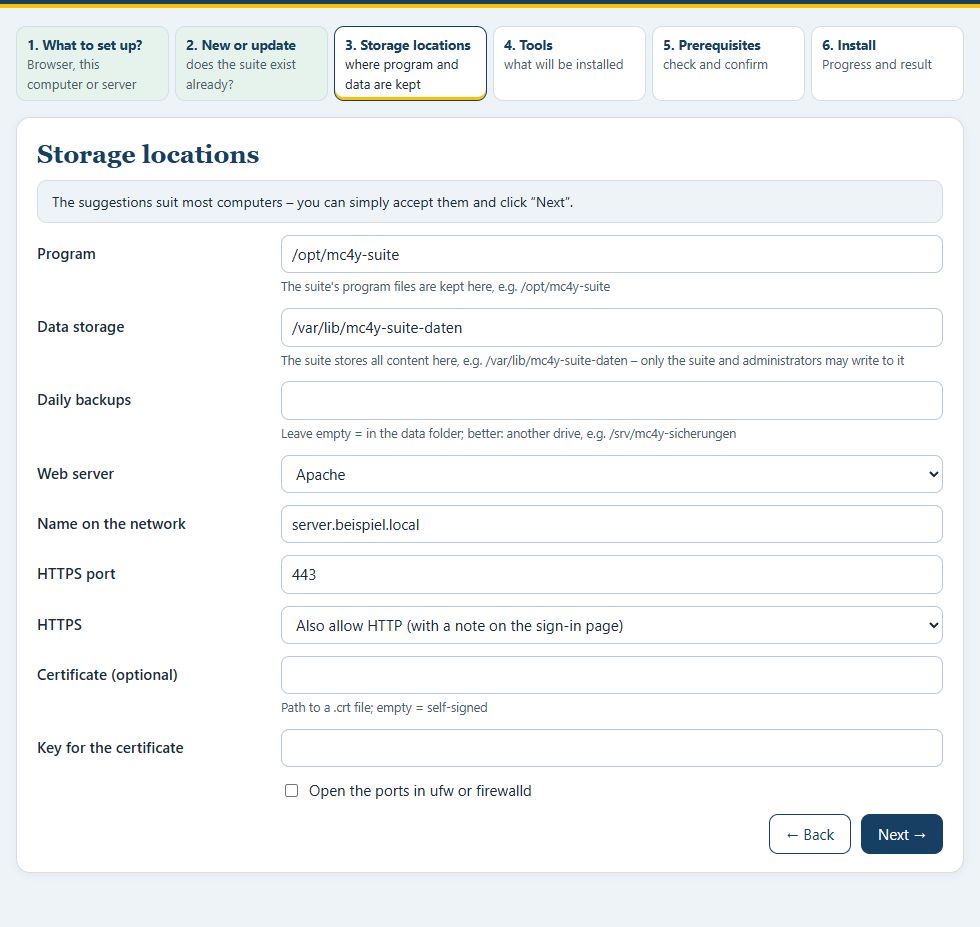
There are four settings for HTTPS: “enforce” (the default), “Also allow HTTP (with a note on the sign-in page)” (--https erlauben, for example for phones without the certificate), “behind a proxy” (--https proxy, when an upstream server terminates TLS) and “off (for testing only)”. You switch an existing installation with --aktualisieren --konfiguration-erneuern --https erlauben. The script opens the firewall only with --firewall (ufw or firewalld); otherwise it gives a note.
What if port 80 is in use?
If another web server is already running on the computer, Apache or nginx cannot start. Since version 0.4.60 the script then stops and names the program that occupies the port, together with the remedy.
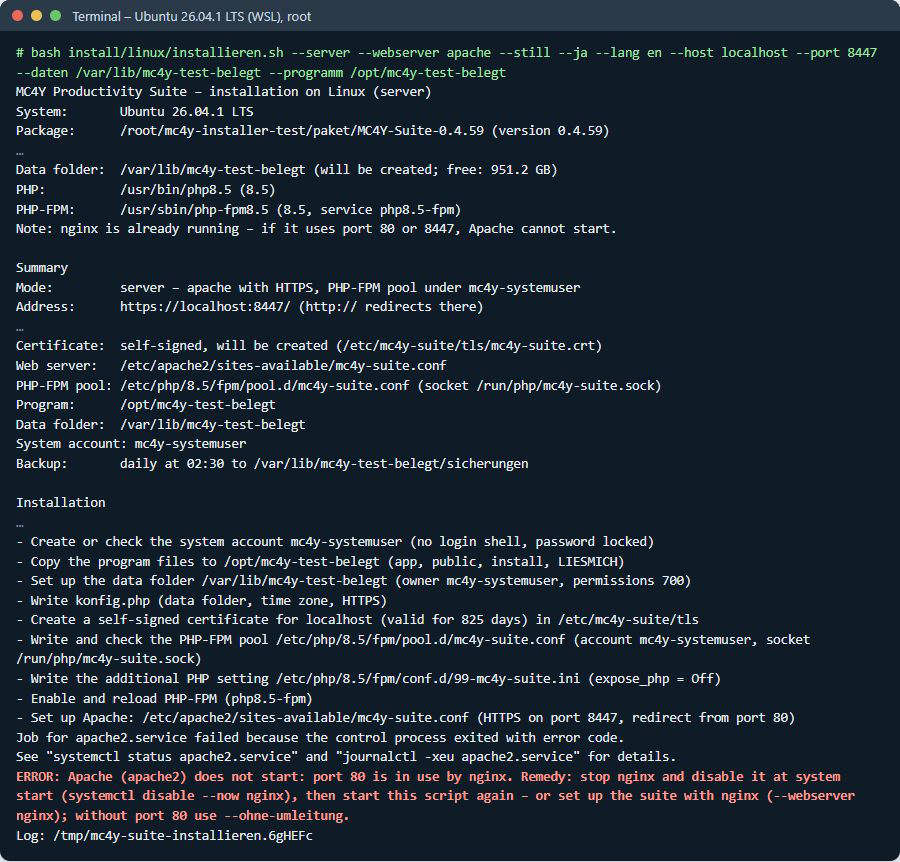
The picture shows the real message from my test run; only lines with the test computer’s name are left out. You have three options: stop the other web server and disable it at system start (systemctl disable --now nginx), set up the suite with that same web server (--webserver nginx) or work without the redirect on port 80 (--ohne-umleitung). If the HTTPS port is in use, choose another one with --port.
Web hosting package without a server of your own
- In your provider’s customer menu, set PHP 8.2 or newer.
- Upload the folders
app,publicandinstallas well as.htaccessandkonfig.beispiel.phpvia SFTP, including hidden files such aspublic/.user.ini. Ideally the domain points to thepublicfolder. - Open the address. The suite shows the dialog for setting up the storage: enter the code from
ablage-einrichtungscode.txt(read it via SFTP) and choose a data folder outside the web directory. - Create the first account; read the setup code via SFTP from
<data folder>/system/einrichtungscode.txt. - For the daily backup, create a cron job:
php /path/to/app/cli.php sicherung --auto, for e-mails additionallyphp /path/to/app/cli.php mail --stillevery 5 minutes.
For personal data you need a data processing agreement with the provider.
HTTPS, certificate and setup file
A self-signed certificate is secure, but other computers do not know it at first. The browser then warns (“Your connection is not private”), and programs such as the taskbar or the CMDB agent refuse the connection. No program of the suite switches off the certificate check; instead, you make the certificate known once. You find it at https://<server name>/zertifikat/mc4y-suite.cer and on the page “Other devices” with its fingerprint (SHA-256 and SHA-1) for comparison.
How do other computers get to know the certificate?
- Many Windows computers: by group policy under Computer Configuration › Policies › Windows Settings › Security Settings › Public Key Policies › “Trusted Root Certification Authorities” › Import.
- One Windows computer: double-click the file › “Install Certificate” › “Local Machine” › “Trusted Root Certification Authorities”, or in PowerShell as administrator
Import-Certificate -FilePath .\mc4y-suite.cer -CertStoreLocation Cert:\LocalMachine\Root. - Linux (Debian, Ubuntu):
sudo openssl x509 -inform DER -in mc4y-suite.cer -out /usr/local/share/ca-certificates/mc4y-suite.crtfollowed bysudo update-ca-certificates. - macOS:
sudo security add-trusted-cert -d -r trustRoot -k /Library/Keychains/System.keychain mc4y-suite.cer. - Firefox: only adopts the Windows certificates with the setting
security.enterprise_roots.enabled.
You import a certificate of your own company under “Local Machine › Personal” and give -Zertifikat <fingerprint> when installing, or you replace it later in IIS Manager under “Bindings”.
The setup file for agents and crawlers
For devices without group policy – Linux servers, Macs, virtual machines – there is the setup file mc4y-erkennung.json. It is created in the suite under “Business Support Tools” › “CMDB” › “📡 Discovery” together with a setup key and contains the suite’s address and key as well as the public part of its certificate with fingerprint. Put the file next to the agent’s installation script; agent and crawler then trust the certificate only for exactly this suite address. Without the file, --zertifikat-holen --fingerabdruck <value> fetches the certificate and compares it with the fingerprint from the suite.
The first account and the setup code
After the installation the browser shows the page “Set up the suite”. The first account becomes the administrator: it manages users, groups and categories. Even the administration sees the contents of the tools only via permission groups.
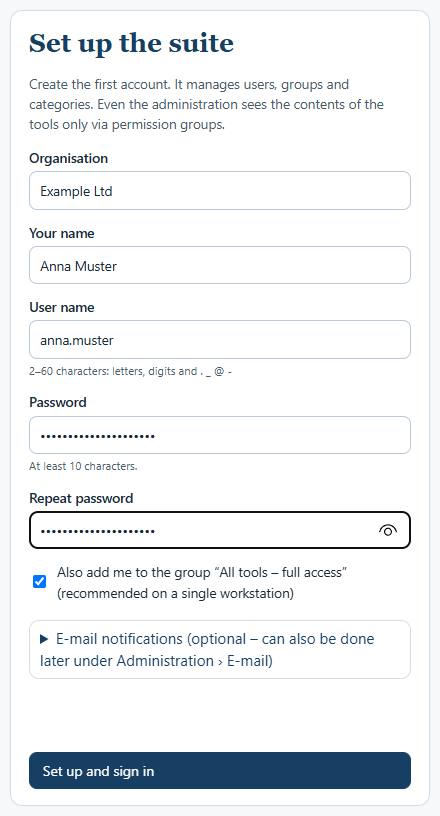
- Enter “Organisation” (it can stay empty), “Your name” and a “User name” without spaces, for example “anna.muster”.
- Enter a “Password” of at least 10 characters and repeat it.
- On a server only: enter the setup code. On a single workstation the field does not appear, because you are sitting at the same computer.
- Leave the box “Also add me to the group “All tools – full access”” ticked and click “Set up and sign in”.
The installation shows the setup code at the end. On Windows Server and with web hosting it is also stored in <data folder>\system\einrichtungscode.txt, readable only by the server’s administrators; on Linux it appears only on the screen, not in the log. It is valid only until the first account has been created, and it does not belong in the backup. Under “E-mail notifications” on the same page you can enter the e-mail settings straight away.
What if I forget my password?
On the sign-in page, “Forgot password?” leads to entering a reset code. The code is generated by whoever looks after the suite, on the computer or server: on Windows with Kennwort-zuruecksetzen.bat in the folder install\windows of the installation, on the Mac with bash "/Library/Application Support/MC4Y-Suite/install/macos/kennwort-zuruecksetzen.command", on Linux with sudo bash /opt/mc4y-suite/install/linux/kennwort-zuruecksetzen.sh. It is valid for 30 minutes, only once, and expires after five wrong entries. There is deliberately no reset by e-mail. For accounts with Windows sign-in you change the password in Windows.
E-mail sending and the mail task
At the top of the portal, the bell 🔔 (button “Notifications”) shows new notifications – invitations, cancellations, assigned tasks, comments, shared notes. If you wish, the suite also sends these notifications by e-mail, plus appointment reminders. You set up sending under “Administration” › “Email”: tick “Switch on sending e-mails”, then SMTP server, port, encryption, user name, password and sender. A test message checks the settings.
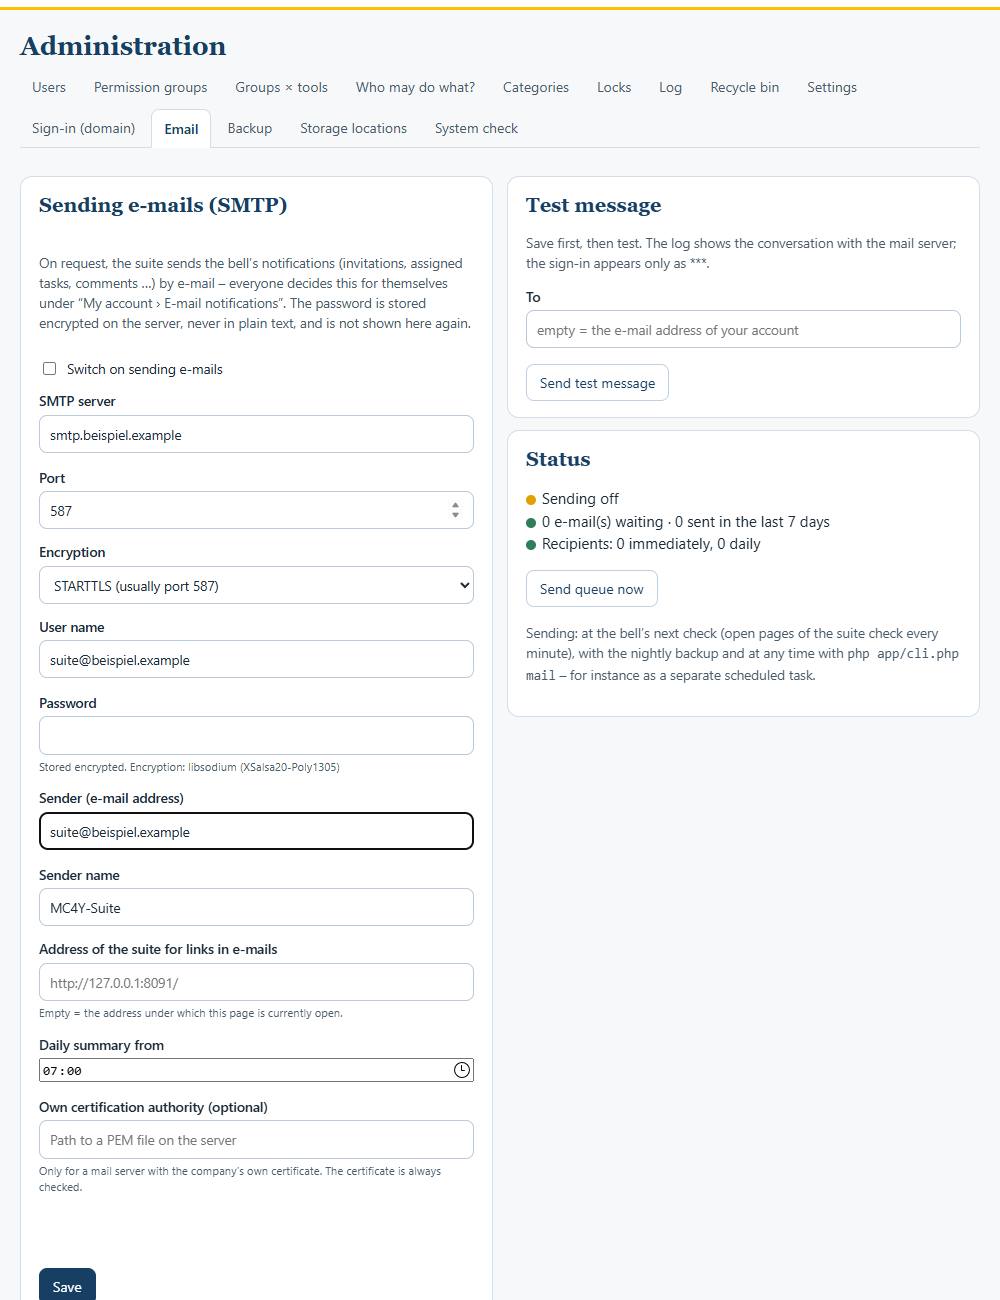
The choices are “STARTTLS (usually port 587)”, “TLS from the start of the connection (usually port 465)” and “none – only a relay in your own network, without signing in”. The password is stored on the server in encrypted form only, the key for it in <data folder>/system/geheim.key; the interface never gets it back. If you move the suite to another server, enter the SMTP password there again. Providers that only allow OAuth are not supported; with two-factor sign-in an app password usually helps.
Mail goes out every 5 minutes via a task that all installation scripts create: on Windows “MC4Y-Suite-Mail”, on Linux the timer mc4y-suite-mail.timer (without systemd /etc/cron.d/mc4y-suite-mail), on the Mac de.my-coaching4you.mc4y-suite.mail under launchd. It calls php app/cli.php mail --still and does nothing as long as sending is switched off. It retries failed attempts at most eight times. Whether and how often a person gets mails is their own choice under their account › “✉ E-mail notifications”. I have not tested sending with real mail providers, nor the task under launchd on a real Mac.
Network drive and calendar with access passwords
The document library can be connected as a network drive (WebDAV), and the calendars can be synchronised in calendar programs (CalDAV). The addresses are https://<server>/dav.php/dokumente/ and https://<server>/dav.php/. These programs do not sign in with the person’s password but with an access password of their own per device.
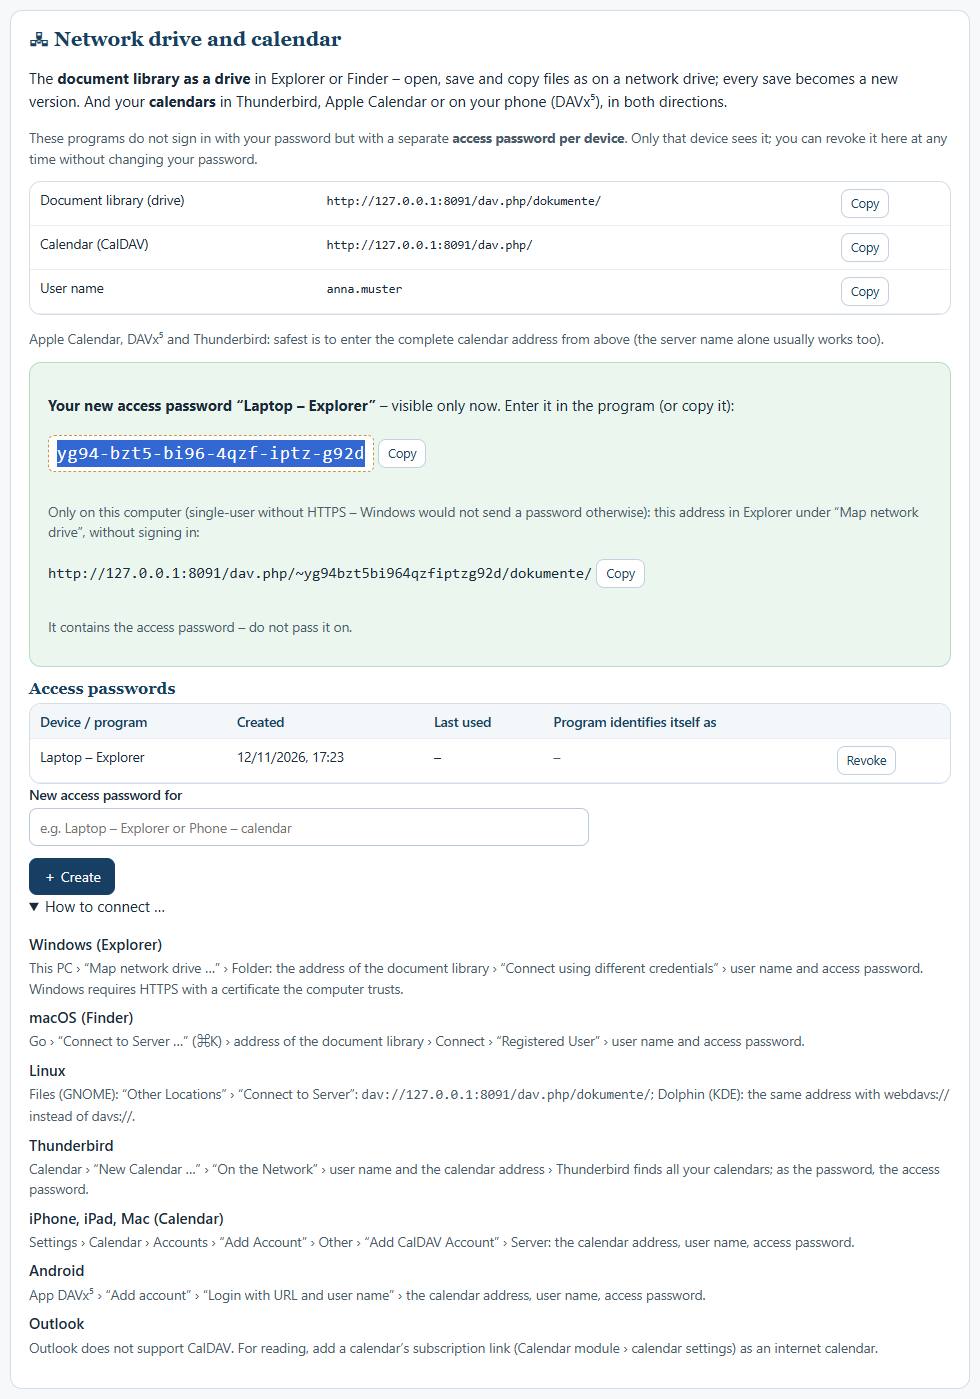
This is how you create one: in the suite, click your name at the top, in the section “🖧 Network drive and calendar” enter a name next to “New access password for”, such as “Laptop – Explorer”, and click “+ Create”. The password is visible only now; with “Revoke” you disconnect the device at any time without changing your own password. Under “Users”, the administration revokes all access passwords of an account at once, for example for a lost phone.
Under “How to connect …” the suite describes the routes for Windows File Explorer, Finder, the GNOME and KDE file managers, Thunderbird, iPhone and iPad, and DAVx⁵ on Android. Important for Windows: File Explorer only sends a password over HTTPS with a certificate the computer trusts. On a single workstation without HTTPS you therefore get a special address that applies only on this computer and contains the access password. Under IIS the short address /.well-known/caldav does not redirect; enter the full address in calendar programs. Existing IIS servers get the required handler “PHP-MC4Y-DAV” once with -Aktualisieren.
I have tested the real Windows File Explorer against a single-workstation suite (connect, write, read, rename) and the interface itself on IIS (35 of 35 checks) and with nginx on Linux (10 of 10). I have not tested Finder, the Linux file managers, Thunderbird, Apple Calendar or DAVx⁵ with the suite. More on this in the post Network drive, calendar and e-mail.
Backup and restore
A backup is a ZIP file with the entire data folder – database, documents, versions, recycle bin – and a list of SHA-256 checksums. The installation sets up a daily backup (php app/cli.php sicherung --auto): on a Windows single workstation at the chosen time (default 12:30), on servers, on Linux and on the Mac at 02:30. By default 14 backups are kept.
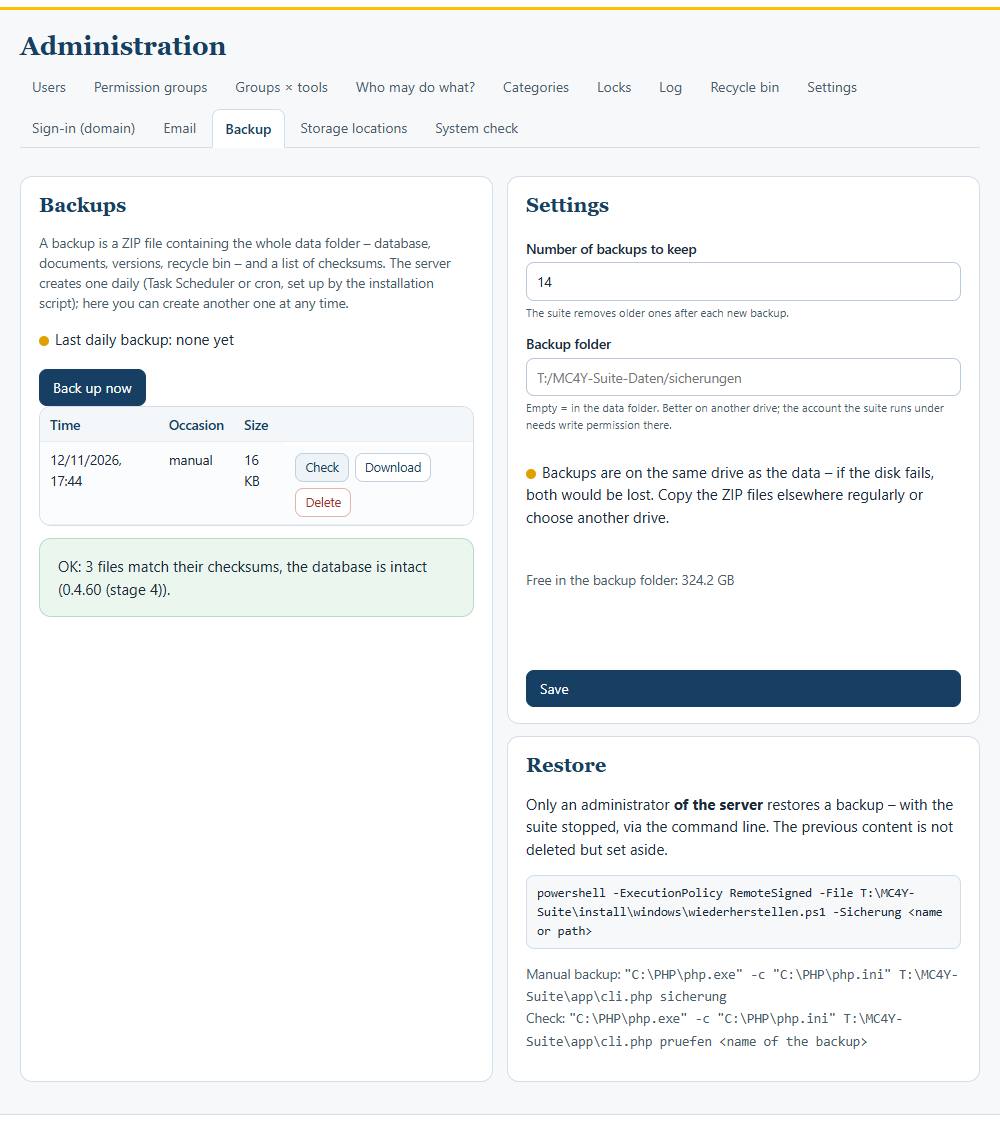
Under “Administration” › “Backup” you can create another one at any time with “Back up now”; “Check” compares the checksums and the database. This is also where you set how many backups are kept and in which folder they are stored. If the backups are on the same drive as the data, the suite points this out in yellow – if the disk fails, both would be lost. Copy the ZIP files to a second drive regularly; they are not encrypted.
Deliberately not included in the backup are system/geheim.key (the key for the SMTP password), the setup code, the backup folder itself, the update backups and temporary files.
How do I restore a backup?
Restoring only works via the command line, by an administrator of the server; the “Backup” page shows the matching command.
- Windows:
powershell -ExecutionPolicy RemoteSigned -File "<program>\install\windows\wiederherstellen.ps1" -Sicherung <name> - Linux:
sudo /opt/mc4y-suite/install/linux/wiederherstellen.sh <name or path> - Mac:
bash "/Library/Application Support/MC4Y-Suite/install/macos/wiederherstellen.command"– without an argument it lists the backups and asks.
The script checks the checksums, asks for confirmation (on Windows you type YES or JA), stops the suite and moves the previous content to <data folder>/_vor-wiederherstellung_<time> – nothing is deleted. While restoring, the suite is in maintenance mode: every request gets the answer that the suite is being restored from a backup and that you should try again in a minute. Scheduled tasks such as e-mail and backup wait for that long; afterwards everyone is signed out and signs in again. If a run is aborted hard, delete the file <data folder>/.wartung by hand. Practise restoring once before you need it. I have not yet tested the maintenance mode together with IIS and PHP-FPM.
Updating
When updating, content, accounts and settings are kept. The installation first backs up the database to <data folder>/_update-sicherung (the last 10 are kept) and replaces only the folders app, public and install. Always start an update from the new, unpacked package.
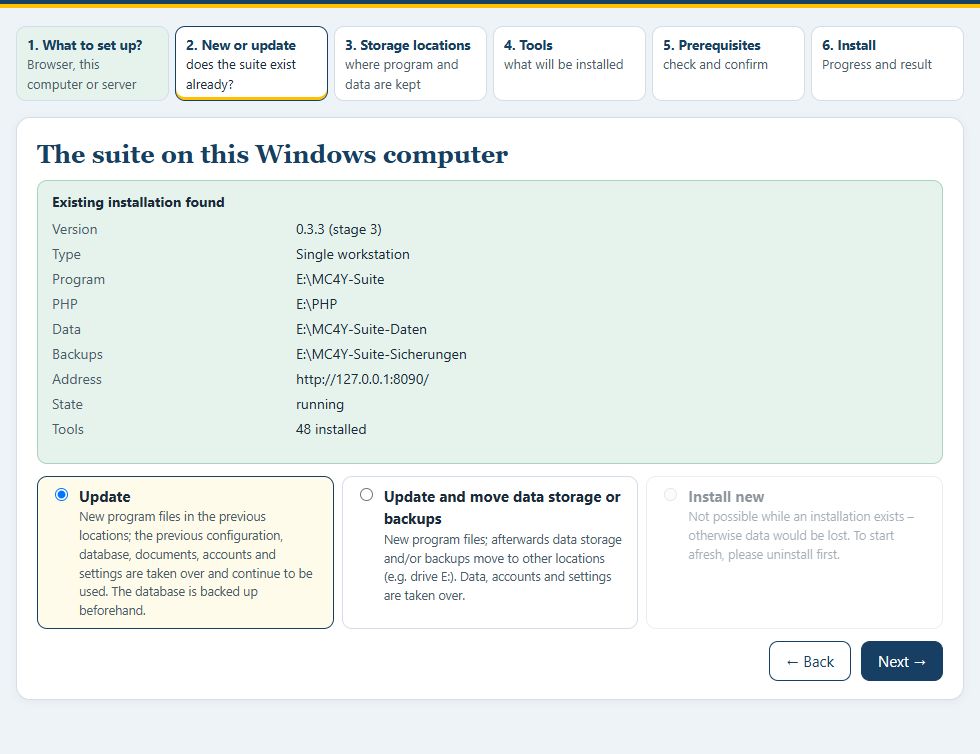
- Graphical installer: it finds the existing installation and preselects “Update”. “Update and move data storage or backups” moves the data to new locations at the same time; “Install new” is blocked as long as an installation exists.
- Windows single workstation:
installieren.bat -Aktualisieren [-DatenNeu E:\MC4Y-Suite-Daten] [-SicherungenNeu F:\…] - Windows Server:
installieren-server.bat -Aktualisierenorauf-server-installieren.ps1 -Server … -Aktualisieren; move with-Umziehen -Programm …. - Linux:
sudo bash install/linux/installieren.sh --aktualisieren; with--konfiguration-erneuernit also rewrites the pool and web server entry. - Mac:
bash install/macos/installieren.command --aktualisieren; this brings the suite’s own PHP to the package’s version and offers the desktop taskbar. - Web hosting: replace
app,publicandinstall;konfig.phpand the data folder stay.
The scripts take the installation’s locations – program, PHP, data, backups, port – from the existing installation, even if it is not on C:. You move only the data folder on Windows with datenordner-verschieben.ps1 -Ziel E:\MC4Y-Suite-Daten, on Linux with datenordner-verschieben.sh <new folder>; on the Mac there is no script for this yet (instructions in install/macos/README.txt). In each case the old folder stays until you delete it yourself after a check.
How do I keep PHP up to date?
Security updates for PHP are as important as those for the operating system. The suite shows the PHP version under “Administration” › “System check”: below 8.2 red, below 8.4 yellow. It does not compare against the latest patch level or security advisories – so you check the version yourself.
- Windows: every installation and every update brings PHP to the latest 8.5 version from windows.php.net by itself (can be switched off with
-OhnePhpUpdate); if that fails, the suite carries on with the previous PHP. In between,install\windows\php-aktualisieren.ps1is enough: it reads the checksums fromsha256sum.txton windows.php.net, installs nothing without a matching SHA-256 checksum, takes over thephp.ini, keeps the old version as<folder>-alt-<time>and rolls back automatically if PHP does not start afterwards. With-Probelaufit only shows, with-Serverit works by remote maintenance. - Linux: PHP comes from your system’s package sources and gets its security updates together with the other packages.
- Mac: the suite’s own PHP has a fixed version (package 0.4.60: PHP 8.4.23), because static-php-cli publishes no checksums. It is brought to the version of the new package when you update the suite, not automatically. Alternatively, use PHP from Homebrew with
--php-quelle homebrew.
Uninstalling
Your content – the data folder – is kept when uninstalling, unless you delete it explicitly.
- Windows single workstation: in the folder
install\windowsof the package or the installation, double-click “deinstallieren”, answer the Windows prompt with “Yes” and confirm the question whether to uninstall the suite. - Windows Server:
deinstallieren-server.bat, with-ZertifikatLoeschenalso the certificate. - Linux:
sudo bash /opt/mc4y-suite/install/linux/deinstallieren.sh– removes services, pool, web server entry, timers, program, system account and/etc/mc4y-suite; PHP, web server and firewall rules stay. - Mac:
bash "/Library/Application Support/MC4Y-Suite/install/macos/deinstallieren.command"– removes the suite, the program “MC4Y Suite”, its own PHP and the hidden system account.
If the data should go too, add -DatenLoeschen (Windows) or --daten-loeschen (Linux, Mac) and type LOESCHEN when asked. The scripts remove the mail and backup tasks as well. The desktop taskbar belongs to your user account and stays; it has an uninstall script of its own.
Installing the desktop taskbar
The MC4Y Taskbar is a program of its own at the edge of the screen that opens the suite’s tools even without an open browser. It needs Python 3.8 or newer with tkinter, but no administrator password.
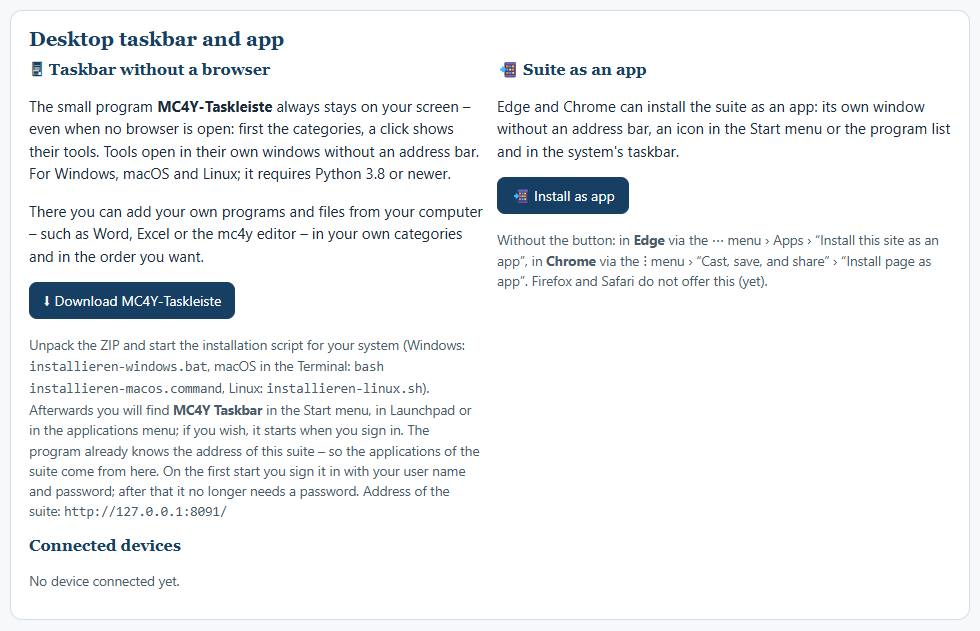
The most convenient way is to download it in the suite: click your name at the top, section “Desktop taskbar and app”, then the download button. Downloaded this way, it already knows your suite’s address. On Windows the graphical installer sets it up straight away (step “Tools”), on the Mac the suite’s installation script does.
- Windows: unpack the package (beforehand “Properties” › “Unblock”) and double-click “installieren-windows”. If Python is missing, the script offers
winget, for your user account only. Target:%LOCALAPPDATA%\Programs\MC4Y-Taskleiste, shortcut “MC4Y Taskleiste” in the Start menu and in the startup folder; switch it on and off under Settings › Apps › Startup. - Mac: in Terminal,
bash installieren-macos.command. Use Python from python.org (“macOS 64-bit universal2 installer”); the Apple Python that comes with macOS is not enough. Start at sign-in via a LaunchAgent, from macOS 13 also under Login Items. - Linux:
sh installieren-linux.sh; install Python and tkinter beforehand with the package manager, for examplesudo apt install python3 python3-tk. The script creates the menu entry and autostart in the user folder.
At the first start the taskbar asks for the suite’s address, user name and password; it does not store the password but receives a device key of its own. If the computer does not know the suite’s certificate, it says so and helps you store it. Removing: “deinstallieren-windows”, deinstallieren-macos.command or deinstallieren-linux.sh. The taskbar is tested on Windows 11 and on Ubuntu in WSL with a virtual screen, not on a real Mac and not on the Linux desktops GNOME, KDE or XFCE.
Setting up the CMDB agent and crawler
The agent reports a computer’s equipment to your suite’s CMDB – system, memory, drives, operating system, installed programs. The crawler searches your own network for further devices (ping, open standard ports, SNMP if desired); one crawler per network is enough. Both transfer inventory data only, no user data. I describe them in detail in the post Agents and crawler.
Creating a key in the suite
In the suite, open the “CMDB” under “Business Support Tools” and there the tab “📡 Discovery”. In the box “🔑 Set up agents and crawlers”, under “Create setup key”, choose what the key is for (“Agents and crawlers”, “agents only” or “crawlers only”), how often the devices report, how long the key is valid and for how many devices. This requires full access to the CMDB.
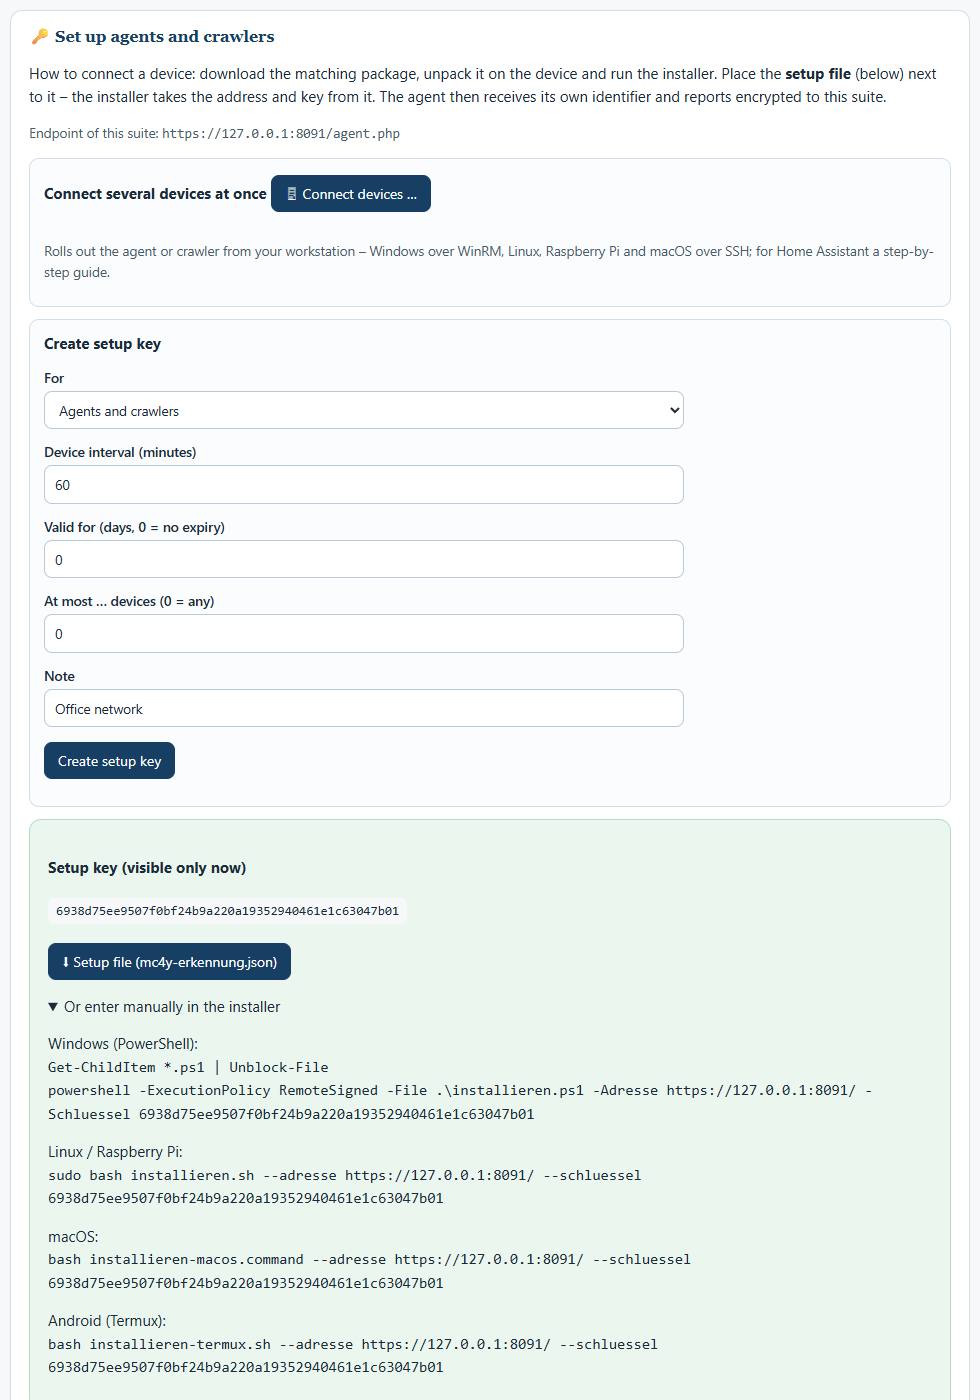
The key is visible only now. Download the setup file mc4y-erkennung.json straight away; it contains the suite’s address, key and certificate. You enter networks for the crawlers in the box “🌐 Networks for the crawlers” (CIDR, IPv4 or IPv6, at most 1,024 addresses per network).
Installing the agent: Windows, Linux and macOS
The simplest way is the graphical installer: choose “Report this device to the CMDB (agent/crawler)”, enter the suite’s address and the setup key, tick the agent and, if you wish, the crawler. If the setup file lies next to it or in “Downloads”, it fills in the fields itself.
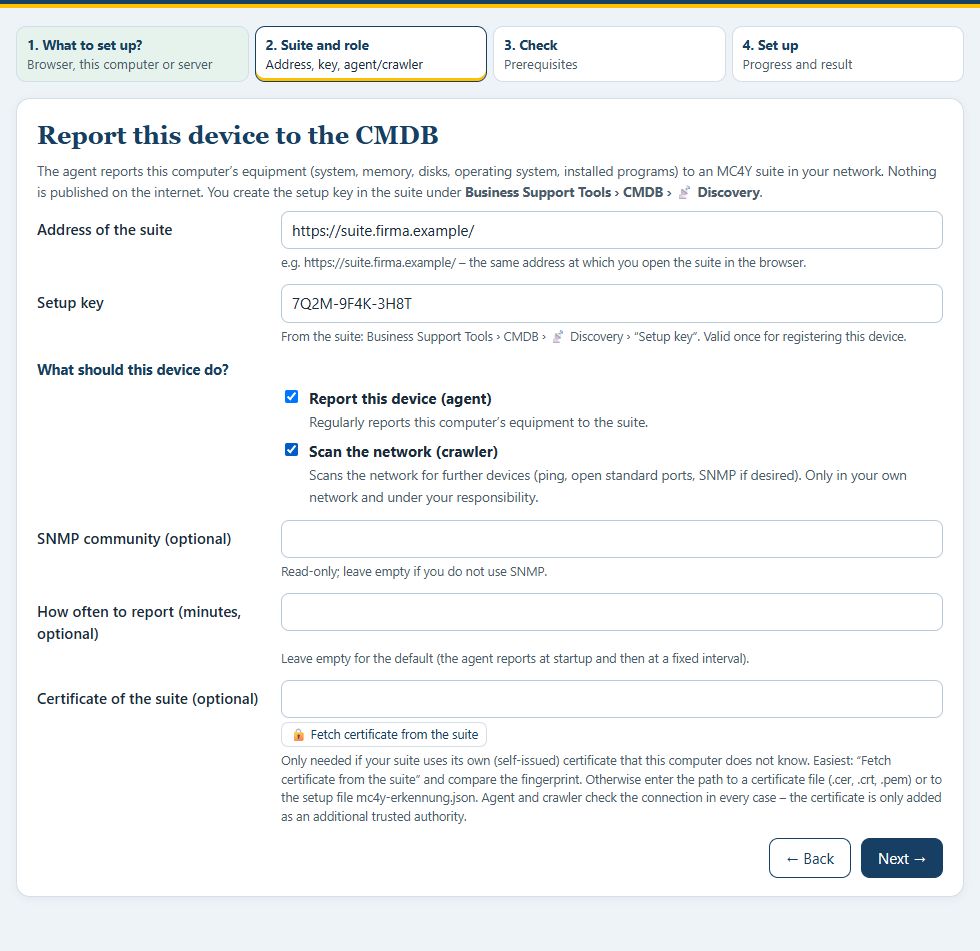
Without the graphical installer, from the package mc4y-erkennung.zip:
- Windows 10/11 and Server from 2016: double-click “Agent-installieren.bat” or “Crawler-installieren.bat”. The agent runs as the scheduled task “MC4Y-CMDB-Agent” under SYSTEM, at boot and every 5 minutes; if Python is missing, the script offers
winget. - Linux and Raspberry Pi:
sudo sh installieren.sh --adresse https://suite.firma.example/ --schluessel <key>, the crawler with--crawler, a preview with--probelauf. This creates a systemd servicemc4y-cmdb-agent, without systemd a cron entry. - macOS 12 and newer:
bash installieren-macos.command, the crawler with--crawler; the service runs under launchd. Python 3 from python.org is required.
Checking: sudo python3 /opt/mc4y-cmdb-agent/mc4y_agent.py --pruefen (Linux). Removing: deinstallieren.ps1 or sudo sh deinstallieren.sh, with --einstellungen-loeschen also the settings; the entry in the CMDB stays. For many computers at once there is the distributor mc4y-verteiler.zip, which reaches Windows via WinRM and Linux, Raspberry Pi and macOS via SSH.
Agent and crawler are tested on Windows 11 and on Ubuntu in WSL including uninstalling; I have not run the macOS scripts, Home Assistant or the distributor for real.
Renewing the agent on an Ubuntu VM: route A and route B
Since agent 1.1 the Linux agent reports as software only explicitly installed packages, everything else as the component “system packages”. Anyone replacing an older agent on an Ubuntu VM has two routes. Beforehand the suite must be at version 0.4.58 or newer, otherwise the new agent creates every package individually again.
- Route A – create afresh: in the CMDB, open the computer and move it to the recycle bin with 🗑; in the preview, leave deleting the software and signing off the agent ticked. On the VM,
sudo sh deinstallieren.sh --einstellungen-loeschen, then with a new keysudo sh installieren.sh --adresse … --schluessel …. Result: a fresh entry with only the explicitly installed programs. - Route B – install over it: install the new agent over the old one; it keeps its identifier and the entry stays the same. Afterwards, in the CMDB under “Group rules”, the clean-up button removes the orphaned software entries (its dry run shows them beforehand).
I have tested both routes on Ubuntu in WSL (route A 20 of 20, route B 14 of 14 checks, also from the delivered package). On a real VM and with the Windows or macOS agent they are not tested.
How do I check that everything works?
- Open the suite’s address: you see the sign-in page.
- Restart the computer and open the address once more: the suite starts by itself.
- In the suite, open “Administration” › “System check”.
- Under “Administration” › “Backup”, click “Back up now” and then “Check” in the new row.
- On a server, do the same from a workstation and, if wanted, from a phone.
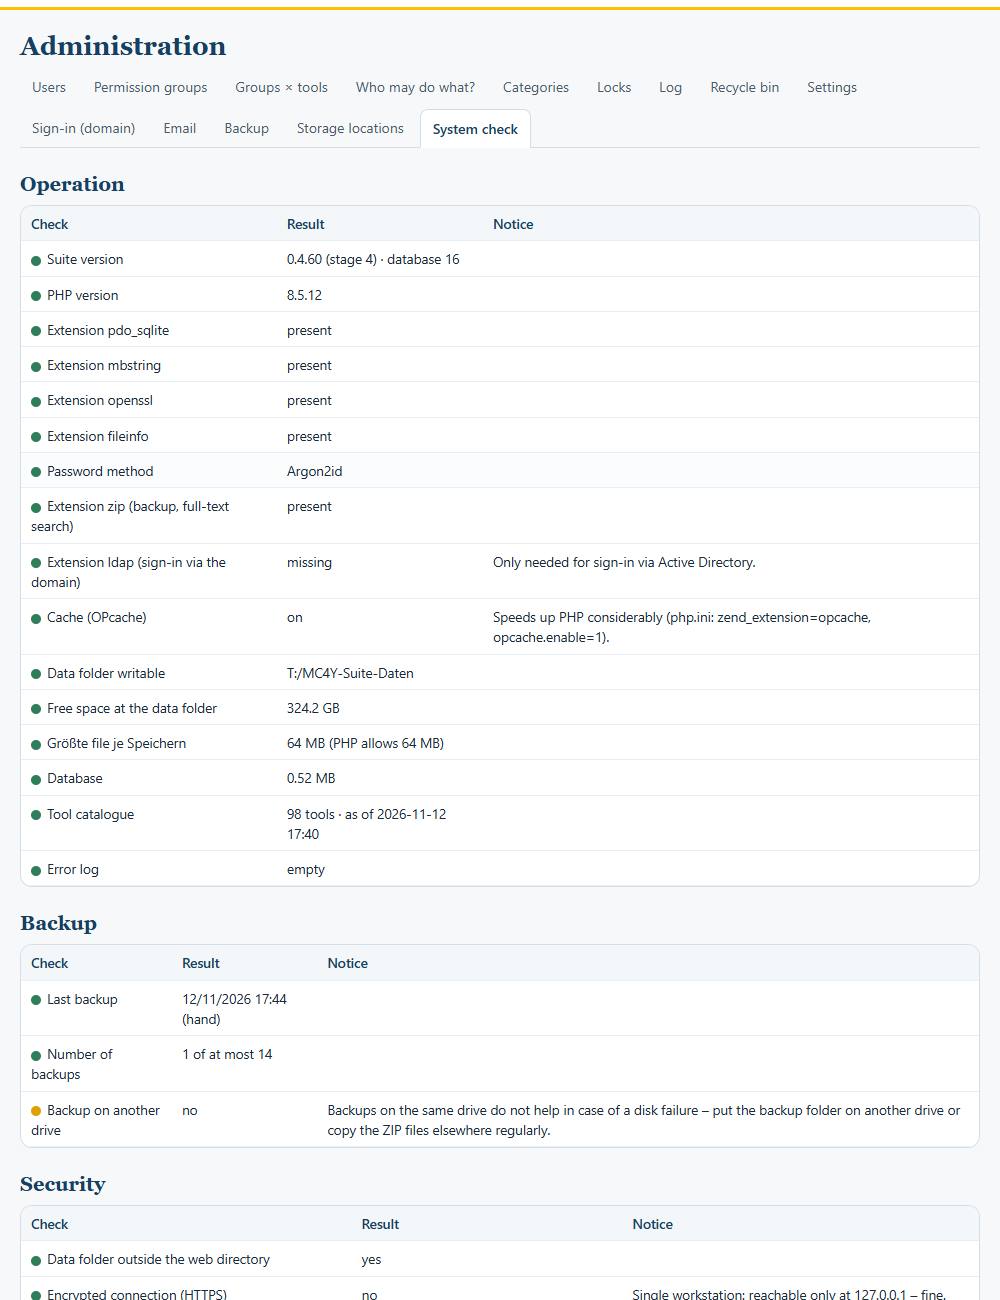
The system check has three groups: operation, backup and security. Green is fine, yellow a recommendation, red you should fix. It turns red, for example, if a required PHP extension is missing (pdo_sqlite, mbstring, openssl, fileinfo, zip); yellow if OPcache is off, the last backup is older than two days or the backups are on the same drive as the data. The row for the error log reports whether the suite has recorded errors. On the command line, php app/cli.php system --lang en shows the same.
Error patterns and their remedies
On Windows
- Blue window “Windows protected your PC”: “More info” › “Run anyway”; in future, before unpacking, “Properties” › “Unblock”.
- The black window closes straight away: the package has not been unpacked. Choose “Extract All…” and start “Installer-starten” in the unpacked folder.
- “Next →” stays grey: a red hint appears under a field; choose a different folder or another drive.
- “Port 8090 … is in use”: enter 8091, for example, next to “Port”; the address is then
http://127.0.0.1:8091/. - PHP does not start: the Visual C++ runtime
vc_redist.x64.exefrom Microsoft is missing. - “The data folder has not been specified” or “The installation is incomplete”: usually after a run that was cut short (antivirus, a declined prompt). Run the installation again; the storage setup dialog does not help for an installation with a service account.
- Your antivirus program speaks up: which files go into quarantine is your decision in your antivirus program; then repeat the installation.
On Linux
- “port 80 is in use by …”: see the section on the Linux server – stop the other web server, switch with
--webserveror use--ohne-umleitung. - “Permission denied” when starting
./installer-starten.sh: putbashin front; nothing may be started directly on network shares and USB sticks. - The package lies in a folder that only your account can see: copy it to the disk with
cp -abeforehand (the script names the command). - “… is not in the sudoers file”: your account may not install anything; use an administrator account.
- PHP too old (for example Ubuntu 22.04 with PHP 8.1): the script names ways to newer packages but does not set up third-party sources. Simpler: a newer version of the system.
On the Mac
- “No such file or directory”: you are not in the package folder;
cd, space, drag the folder into Terminal, Return. - “Sorry, try again.”: the password was wrong.
- “… is not in the sudoers file”: your account is not an administrator.
- “Operation not permitted”: System Settings › “Privacy & Security” › “Files and Folders” › under “Terminal”, switch on the “Downloads Folder”.
- PHP could not be downloaded: check the internet connection; without internet, put the file named in the message into a folder
voraussetzungenin the package. - Python for the taskbar is missing: the suite runs anyway; install Python from python.org and run
bash install/macos/installieren.command --aktualisieren --taskleiste --lang en.
In the browser and on the network
- “Your connection is not private”: this computer does not know the certificate – make it known (see the certificate section) and use the server’s full name.
- “User name or password incorrect”: every suite has its own accounts; the account on your own PC does not apply on the server. After five failed attempts an account is temporarily locked.
- The address shows “This site can’t be reached”: wait a minute and reload, otherwise restart the computer. If that does not help, the installation log
installation_<date>.logis in the program folder. - The phone does not find the server: use the IP address or the QR code under “Other devices”; on Windows Server,
Erreichbarkeit-pruefen.bathelps.
Frequently asked questions
Do I need a database or a web server for the suite?
Not on a single workstation: the suite uses PHP’s built-in web server and the SQLite included in PHP. For server mode the installation sets up IIS, Apache or nginx itself.
Can I open the single-workstation suite from my phone?
No. The single-workstation installation deliberately listens only on 127.0.0.1. For phone, tablet and further PCs you need a server installation in the same network; when travelling, a VPN connection belongs in front of it – not the suite on the open internet.
Why do I have to choose the storage locations myself?
Because your data is at stake. The installer suggests locations but does not fix anything silently. That way you see where the database and the backups are, and you can put the backups on a different drive.
What is the difference between the setup code and the setup key?
The setup code is valid once, for the first account of a server installation. The setup key registers agents and crawlers with the CMDB; you create it in the suite as often as you like.
Does the suite work on Debian, Fedora or openSUSE?
The installation script is written for them and recognises the package manager itself. However, I have only tested it on Ubuntu 26.04.1 in WSL. On other distributions, run --probelauf first; I would be glad to see the output.
What happens to my data during an update?
It stays where it is. Beforehand the installation backs up the database to _update-sicherung; only program files are replaced.
How do I move the suite to another computer?
Install it on the new computer, create a backup on the old one, copy it to the new one and restore it there. Afterwards you enter the SMTP password again, because the key for it is deliberately not in the backup.
Is this guide available as a PDF?
Yes. The installation guide and the user manual are available in German and English as PDFs under Resources in the e-books section.
Important notes and trademark notices
The suite is free software (GPL-3.0-or-later) and is provided free of charge and without any warranty. Whoever installs it operates it themselves and is responsible for the data in it; it transfers nothing to me. Before using it with client data I recommend an encrypted hard disk, backups in a second location and an independent security review; the operations manual in the package (public/handbuch.html) contains a checklist for this. I do not offer operation for others.
The suite’s coaching tools are aids for reflection, conversation and documentation. Coaching services are psychological counselling activities outside the practice of medicine and are not psychotherapy within the meaning of Section 1 (3) of the German Psychotherapists Act (PsychThG). Operational implementation is not part of the freelance services; the implementation of the advice is carried out by the client or the client’s partners.
Trademark notices: Windows, Windows Server, IIS, Active Directory and Edge are trademarks of Microsoft Corporation; macOS, Safari and iPhone are trademarks of Apple Inc.; Linux is a registered trademark of Linus Torvalds. Ubuntu is a trademark of Canonical Ltd., Debian a trademark of Software in the Public Interest, Inc., Red Hat and Fedora are trademarks of Red Hat, Inc., openSUSE is a trademark of SUSE LLC, Raspberry Pi a trademark of Raspberry Pi Ltd.
Apache is a trademark of the Apache Software Foundation, nginx a trademark of F5, Inc., Python a trademark of the Python Software Foundation, Firefox and Thunderbird are trademarks of the Mozilla Foundation, Chrome and Android trademarks of Google LLC. The names are used for description only; there is no connection with the trademark owners.
I am happy to receive questions, error reports and feedback – especially on macOS and further Linux distributions – via the contact form. Would you like to introduce the suite in your team and clarify processes, roles and responsibilities along the way? Get in touch.
Sources
- PHP for Windows: windows.php.net; PHP for the Mac: static-php-cli. PHP is under the PHP licence and is not included in the package.
- Python: python.org; on Windows optionally via winget, Microsoft’s package manager.
- Licence of the suite: GNU General Public License, version 3 or later.
- In the package:
INSTALL.txt,install/windows|linux|macos/README.txt,erkennung/README.txt,taskleiste/README.txtand the operations manualpublic/handbuch-en.html.
Open or download the tools
- MC4Y productivity suite (installation package)Download (26.3 MB)
- All MC4Y packages in one (English version, ZIP)Download (48.9 MB)
- MC4Y tools for the browser (all tools in one package, ZIP)Download (19.7 MB)
- MC4Y CMDB: agents and crawlers (installation package)Download (91 KB)
- MC4Y CMDB: connect devices (roll-out helper, installation package)Download (85 KB)
Thinking further
You can find more on this topic under resources and downloads – or talk to me directly in a free initial consultation.
Comments
Comments are published immediately with your name. Only the name, title, comment text and time are stored – see the privacy policy.
Loading comments …